S/MIME
S/MIME relies on Public Key Infrastructure (PKI). PKI is a technology that enables the secure exchange of information over untrusted networks using public key cryptography. PKI employs X.509 certificates to associate a public key with a specific identity. S/MIME adopts a hierarchical trust model in which trust is established from the bottom up. The root of the trust hierarchy is accepted without verification, and all intermediate and leaf certificates (representing end users and intermediaries) are trusted because they descend from this trusted root.
Within PKI, the trust chain from the root to the end-user certificate is formed by a sequence of signed certificates. The root certificate signs an intermediate certificate, and the intermediate certificate signs the end-user certificate. Certificates are signed using the issuer’s private key. If any part of a certificate is modified after it has been signed, the digital signature becomes invalid, rendering the certificate unusable.
S/MIME is an open standard as defined in RFC 8551, and it is broadly supported across a wide range of platforms.
X.509 certificate
An X.509 certificate typically includes a variety of fields that help identify its purpose, validity, and ownership. The following elements are commonly found in an X.509 certificate (this list is not exhaustive):
- Public Key
The cryptographic public key associated with the certificate
- Subject
The entity (such as a user, computer, or organization) to which the certificate is issued.
- Email Address:
An email address tied to the subject, helping to uniquely identify the entity.
- Issuer
The Certificate Authority (CA) that issued and signed the certificate.
- Serial Number
A unique number assigned by the issuer to distinguish this certificate from others.
- Not Before
The date and time before which the certificate is not considered valid.
- Not After
The date and time after which the certificate expires and is no longer valid.
- Key Usage
Specifies the intended cryptographic uses of the public key, such as digital signature or key encipherment.
- Extended Key Usage
Defines additional uses for the public key, such as server authentication or client authentication.
These fields are used by systems and applications to verify the identity of entities, control certificate validity periods, and determine the ways in which a certificate can be used. Some of the main elements of an X.509 certificate will be discussed.
Public Key
The public key is a component of a cryptographic key pair, consisting of a public and a private key. It is the non-confidential, shareable part, intended to be distributed freely to others. External parties use the public key in two primary ways: to verify digital signatures and to encrypt messages. When a sender wants to encrypt data for a recipient, they use the recipient’s public key, ensuring that only the intended recipient, who holds the matching private key, can decrypt the message. Similarly, to authenticate the origin and integrity of a message, recipients can use the public key to verify the sender’s digital signature. The security of these operations depends on keeping the private key confidential while allowing anyone to use the public key.
Subject
The subject field of a certificate identifies the entity the certificate was issued to. This typically includes attributes such as the owner’s name. In addition, the subject field may contain one or more email addresses associated with the certificate owner. Including email addresses is common for certificates intended for secure email use. The subject field allows applications to programmatically verify the identity and contact information of the certificate holder. Other attributes in the subject, such as organization or location, may also be present, depending on the use case and certificate profile.
Email address
The email address associated with the certificate recipient. A single certificate can include multiple email addresses. Email addresses may be present in different parts of the certificate, such as the subject distinguished name or the subject alternative name extension. These email addresses identify the intended owner(s) of the certificate for purposes such as secure email communication and authentication. When verifying a certificate, it is important to consider all listed email addresses to ensure proper validation of the certificate user’s identity.
Issuer
The issuer field contains the distinguished name of the entity that issued this certificate. In most cases, this will refer to a Certificate Authority (CA) that has signed and issued the certificate. For root certificates, the issuer and subject are the same because root certificates are self-signed; that is, they are signed by their own private key and are at the top of the certificate trust hierarchy. Understanding the relationship between issuer and subject is essential for validating certificate chains and establishing trust in secure communications.
Serial Number
Each certificate must include a serial number. This serial number must be unique for each issuer; in other words, an issuer must never create more than one certificate with the same serial number. The combination of the issuer’s identity and the certificate’s serial number serves as a unique identifier for the certificate. This means that even if two issuers use the same serial number in their certificates, the certificates can still be distinguished because the issuer is different. This unique identification is important for tasks such as certificate revocation and management.
Not Before
The date before which the certificate cannot be considered valid. Any attempts to use the certificate before this date will fail validation checks and the certificate will be rejected as not yet valid. This “not before” date is set by the certificate issuer and defines the earliest moment when the certificate is trusted for its intended purposes, such as authentication or signing. Ensure that the system date and time are correct to avoid accidental rejection of certificates that are not yet valid or already expired.
Not After
The date and time after which the certificate is considered expired and should not be trusted for authentication or encryption purposes. After this date, systems relying on the certificate may reject it, and renewed or replaced certificates may need to be issued to maintain secure communication.
Key Usage
A public or private key can serve several functions. For instance, a private key might be used to generate digital signatures or to decrypt data. However, a certificate issuer may wish to limit how a key is used by specifying certain key usage restrictions. The commonly recognized key usage types include:
- digitalSignature
Allows the key to be used for verifying digital signatures.
- nonRepudiation
Ensures the key can be used for actions that require proof of origination, preventing the signer from denying involvement.
- keyEncipherment
Permits the key to encrypt other keys, often in the process of exchanging session keys.
- dataEncipherment
Enables the key to directly encrypt user data.
- keyAgreement
Allows the key to establish session keys, typically during key exchange protocols.
- keyCertSign
Authorizes the key to sign certificates, usually in the context of a Certificate Authority.
- CRLSign
Permits the key to sign Certificate Revocation Lists.
- encipherOnly
Restricts the key’s use to only data encryption as part of key agreement.
- decipherOnly
Restricts the key’s use to only data decryption as part of key agreement.
If a certificate does not specify any key usage, the associated key is generally considered valid for all possible uses. For S/MIME encryption, it is required that the key usage include at least the keyEncipherment permission, if any usage constraints are set. For S/MIME signing, the key usage should include at least digitalSignature or nonRepudiation if key usage restrictions are present.
It’s important to note that improper key usage settings may cause security applications to reject a certificate. Always ensure the key usage attributes in a certificate are appropriate for the intended application.
digitalSignature vs nonRepudiation
Non-repudiation provides a higher level of assurance than a standard digital signature. In the context of digital certificates, the nonRepudiation attribute indicates that the certificate is intended to be used for processes where the signer cannot reasonably deny their involvement. Typically, certificates with the nonRepudiation flag should be qualified certificates and are recommended to be stored on secure hardware devices, such as smart cards or hardware security modules (HSMs). This added security helps protect the private keys from unauthorized access and ensures the legal validity of critical digital transactions.
Extended Key Usage
The extended key usage extension, when present in a certificate, defines specific purposes for which the certificate is intended to be used. This provides a finer level of control beyond the basic key usage extension, enabling administrators or applications to restrict certificates to certain roles or protocols. For example, a certificate could be limited to server authentication, client authentication, code signing, email protection, timestamping, OCSP signing, IPsec operations, or smart card login. By specifying extended key usages, certificate issuers can help ensure that certificates are only used in appropriate contexts.
If the extended key usage extension is not defined in a certificate, the key is considered usable for all purposes according to standard public key infrastructure (PKI) practices. When issuing certificates for S/MIME, if the extended key usage extension is present, it must at a minimum include either the anyKeyUsage or the emailProtection purpose. This ensures that the certificate is recognized as valid for secure email operations, such as signing and encrypting email messages.
Thumbprint
A thumbprint is not an actual field within an X.509 certificate, but rather a value derived from the certificate data itself. Specifically, a thumbprint is a cryptographic hash—commonly using algorithms such as SHA-256—computed over the binary encoding of the entire certificate. This hash produces a short, fixed-length string of characters that serves as a unique identifier for the certificate. Thumbprints are frequently used to quickly verify or reference certificates in systems where the full certificate data is not needed, helping ensure that each certificate can be reliably and uniquely identified.
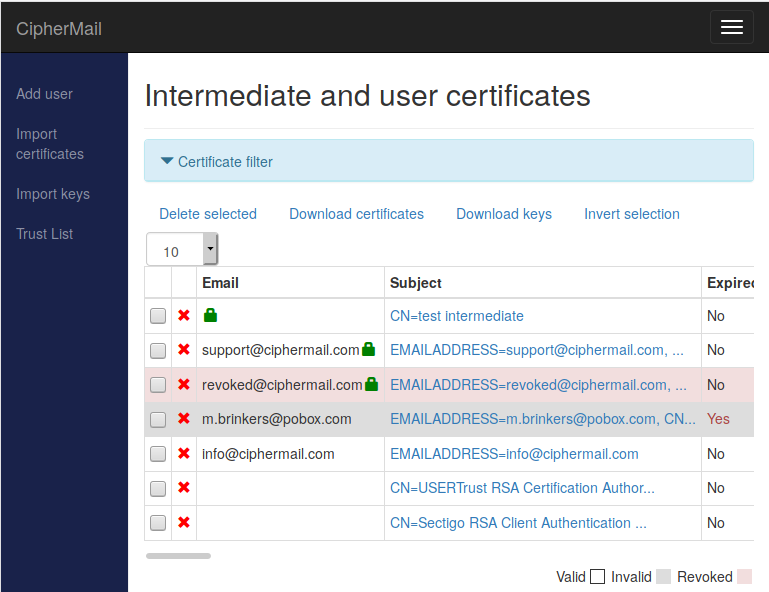
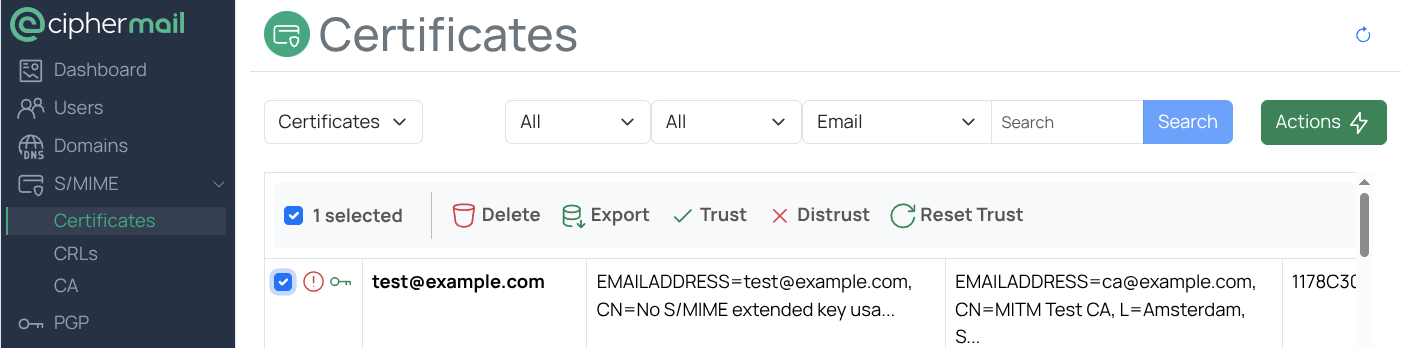
Certificate store
The certificate store maintains both end-user and intermediate certificates. End-user certificates, which are commonly issued to internal users, are used for digital signing and decryption purposes. Each of these end-user certificates typically has an associated private key, enabling secure operations such as signing messages or decrypting information.
You can add new certificates or keys to the certificate store through an import process. To import public certificates, use certificate files in formats such as p7b, cer, or pem. You can do this by selecting the Import certificates action.
If you need to import certificates that also contain private keys, use files in pfx or p12 format. These can be imported using the Import keys action. It is important to store private keys securely, as they are essential for cryptographic operations and must not be accessible to unauthorized users.
Each certificate can be in one of several states: valid, invalid, or revoked. To view the details of a certificate, including information such as issuer, expiration date, and usage constraints, click the certificate’s Subject field in the interface. If a particular certificate is not trusted, you can check the certificate’s Info field for more details about the trust status and reasons for distrust, such as an expired certificate, mismatched issuer, or revocation.
Root store
The root store holds all trusted Certificate Authority (CA) root certificates used by the system to verify and establish trust in digital certificates. By default, the gateway does not include any root certificates in its root store. To enable trusted connections, you must manually import root certificates. This can be done by selecting the Import certificates option. Imported root certificates are essential for validating the authenticity of server and client certificates during secure communications.
Tip
- A default set of system trusted root certificates can be imported by running the cli command:
ciphermail-cli certificate import system-roots
Revocation checking
If a certificate becomes compromised or should no longer be trusted for any reason, it must be revoked to prevent its further use. Certificate revocation involves placing the certificate on a Certificate Revocation List (CRL). A CRL is a list maintained and published by a Certificate Authority (CA), detailing certificates that are no longer valid. The CRL is updated and distributed periodically to ensure up-to-date revocation information is available to all clients and systems that rely on digital certificates.
After a certificate appears on the CRL, it should not be used under any circumstances. Common reasons for revocation include key compromise, CA compromise, changes in the holder’s affiliation, cessation of operation, or other reasons as defined by the CRL standard.
Periodic CRL update
The gateway routinely scans the list of Certificate Authority (CA) certificates for Certificate Revocation List (CRL) distribution points. By default, this scan occurs every 6 hours. During each scan, the gateway attempts to download the latest CRL from the URLs specified in the CRL distribution points section of each CA certificate. If the gateway successfully downloads a new CRL, it replaces the previous version in the CRL store.
Tip
If a certificate authority (CA) has issued a certificate but does not maintain a Certificate Revocation List (CRL), an alternative method for revoking the certificate is to add it to the Certificate Trust List (CTL). A CTL is a predefined list maintained by an administrator that contains certificates which are either explicitly trusted or explicitly untrusted. Including a certificate on the CTL allows systems to recognize the certificate as untrusted, even if a CRL is not available for that CA.
Certificate selection
The gateway automatically selects the appropriate certificates for both signing and encryption operations. Certificates are only used if they meet strict validity requirements: they must be trusted, not expired, not revoked, and fit for the intended use. To be considered trusted, a certificate must have a valid trust chain up to a recognized root certificate authority. This means the root certificate authority must be installed in the system’s root store. Certificates failing any validity checks, such as expiration or revocation, will not be used by the gateway.
Encryption certificate selection
Encryption certificates can be assigned either to individual users or to an entire domain, depending on organizational needs. To manage these assignments, navigate to the preferences page for a user or domain and select . This will open the encryption selection page.
On this page, you will see a list of all encryption certificates currently selected for the user or domain. By default, when a user was selected, the system only displays certificates that include email addresses matching the user.
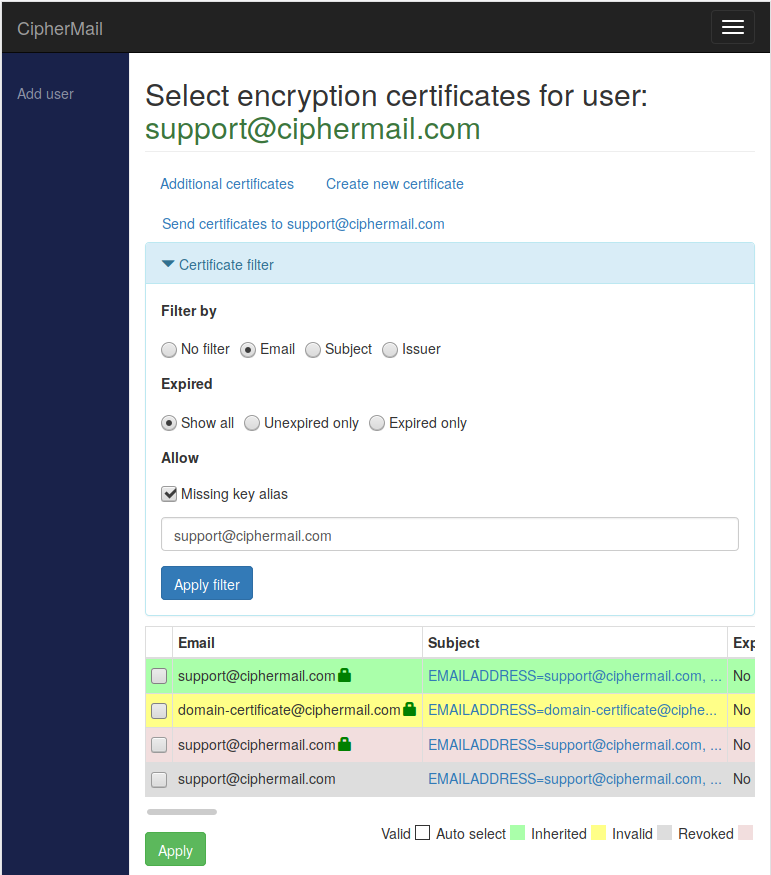
Users can have any number of certificates linked to their account. The system will try to choose the correct certificate automatically, following strict PKI rules. A certificate is selected automatically only when the email address on the certificate matches the user’s email address. If no certificate is selected automatically, for example, because the addresses do not match, an administrator can manually choose a certificate to use for that user.
When an email is sent with S/MIME encryption, all selected certificates for the recipient are used. This ensures the recipient can open the message with any matching private key they own. The benefit is flexibility: the recipient can decrypt the email with different keys on different devices. For example, a key stored on a home computer can be used when reading the email at home, while a key on an office computer can be used when reading it at work.
Certificates can be manually selected and deselected by selecting the certificate checkbox and clicking Save. Automatically selected certificates cannot be deselected. The certificate can be completely removed if the certificate is no longer required. Alternatively you can deselect the advanced S/MIME setting “Auto select certificates” for the user if automatic selection of certificates for the user is unwanted.
Selecting a certificate manually does not guarantee it will be used for encryption. If the certificate is not valid, it will be ignored even if you select it.
To use a selected certificate, ensure it is valid. The steps depend on why it is not trusted:
If the certificate chain is incomplete or invalid, import the required root and intermediate certificates.
If you cannot complete the certificate chain, you can whitelist the certificate by adding it to the Certificate Trust List (CTL).
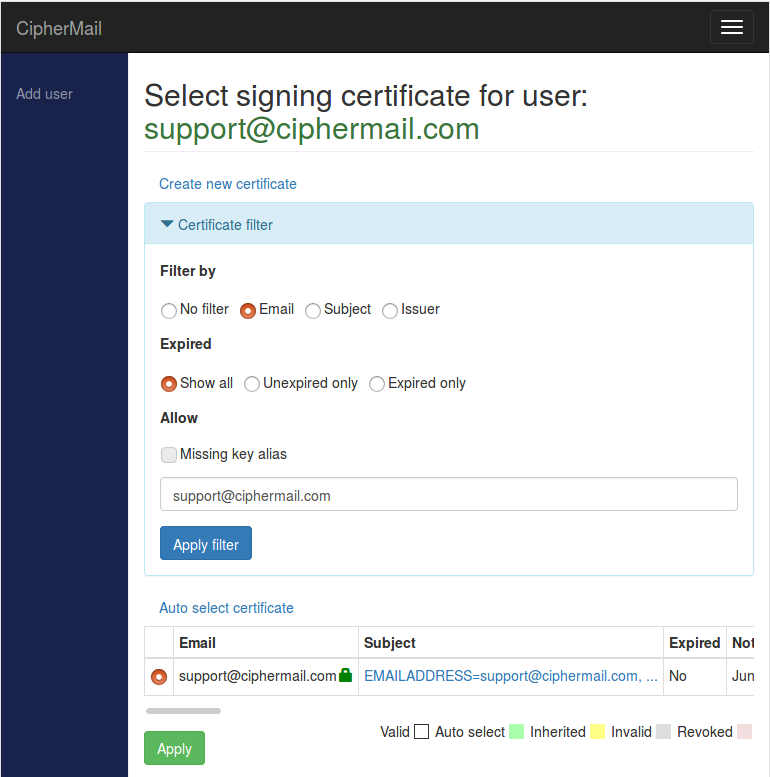
Signing certificate selection
You can select a signing certificate for an individual user or for a domain. To open the Select signing certificate page, go to the preferences page and choose Select signing certificate from the S/MIME menu () This page displays the certificate currently selected for the user or domain. By default, only certificates whose email address matches the user or domain will be shown.
Only certificates that include a private key can be selected, and each user can have only one signing certificate selected at a time. The system will try to choose a signing certificate automatically by looking for a valid certificate that matches the user’s email address. If more than one certificate is suitable for signing, the first one found will be selected.
An administrator can override the automatic selection by manually choosing a different certificate. If a certificate was selected manually, you can return to automatic selection by selecting .
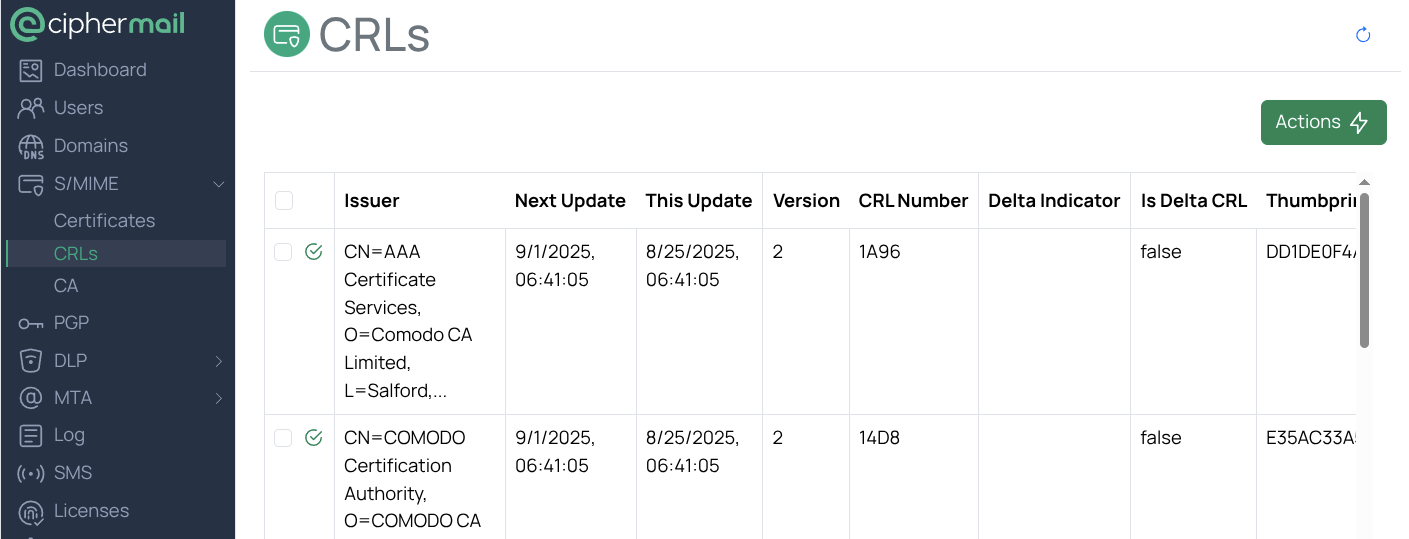
CRL
A Certificate Revocation List (CRL) is a list of digital certificates that have been revoked and must no longer be trusted. Most Certificate Authorities (CAs) make their CRLs available on the internet via HTTP or LDAP. The web addresses (URLs) for these CRLs are included in certificates under the “CRL distribution points” extension. The gateway automatically checks all certificates every six hours to find these distribution points and download the corresponding CRLs. Downloaded CRLs are saved in the CRL store. You can also trigger an immediate update by selecting .
CTL
With S/MIME, certificate trust follows Public Key Infrastructure (PKI) rules. If the full certificate chain to a trusted root is not available, the certificate will not be trusted.
The CipherMail Gateway lets you manually mark a certificate as trusted or distrusted. To do this, select the certificate and choose Trust or Distrust from the selection menu.
Examples of when explicitly marking certificates as trusted or distrusted is helpful:
A certificate has been compromised and must no longer be used, but the issuing certificate authority does not publish a certificate revocation list (CRL). In this case, add the certificate to the Certificate Trust List (CTL) as distrusted (blocklist).
A certificate appears invalid because the required root certificate is missing, but the administrator has independently verified that it is legitimate (for example, by confirming the thumbprint over the phone). In this case, add the certificate to the CTL as trusted (allowlist).
To restore the default PKI trust validation, select the certificate, then choose Reset Trust.
Intermediate certificates
When you mark and intermediate certificate as untrusted, every certificate it has issued, both directly and through any lower-level intermediates, will also be treated as untrusted.
Trust does not work the same way. If you mark an intermediate certificate as trusted, the certificates it issues are not automatically trusted. To trust a specific certificate, you must add that certificate to the Certificate Trust List (CTL) explicitly.
CA
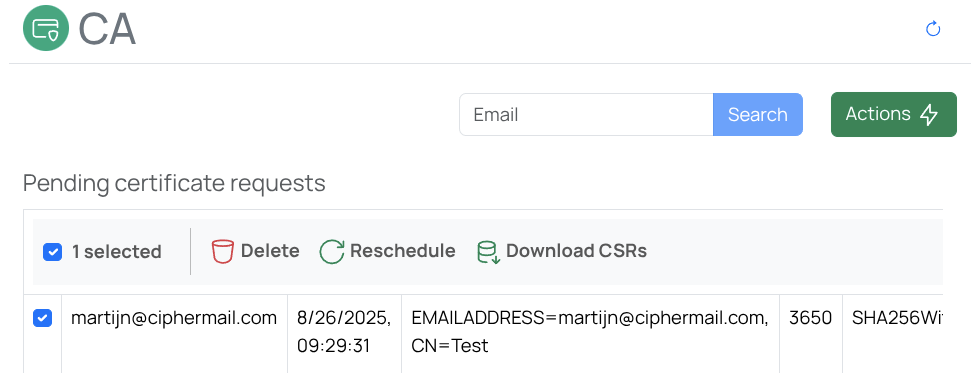
Pending requests
Most certificate requests are not issued immediately. Requests that are not processed right away are placed in the Pending requests queue and handled in the background. To view or manage outstanding requests, open the Create new end-user certificate page and select Pending requests.
When you select a pending request, a menu appears with options to delete the request, reschedule it, or download the request.
- Delete
Delete the selected pending requests
- Reschedule
Pending requests are processed periodically by their assigned request handler. To run selected items immediately, choose Reschedule selected.
- Download CSRs
If a request is generated by the CSR handler, the CSR can be downloaded.
Certificate Request Handlers
CipherMail Gateway includes a flexible, pluggable system for managing
certificate requests. You can add new certificate request handlers to integrate
with different internal or external certificate authorities (CAs). A certificate
request handler is responsible for creating and retrieving certificates and
their private keys. By default, the following handlers are available: Local CA,
CMP, CSR, CEMA  , GlobalSign Atlas and SwissSign .
Attention
CipherMail integrates with external certificate providers, which may change their services or policies at any time. Such changes can affect the ability to request or manage certificates through CipherMail. While we aim to maintain compatibility and will make reasonable efforts to support these providers, continued operation depends on the provider’s willingness and ability to work with us. Support for external certificate providers is therefore offered on a best-effort basis, and CipherMail cannot be held responsible for disruptions or limitations caused by changes outside our control.
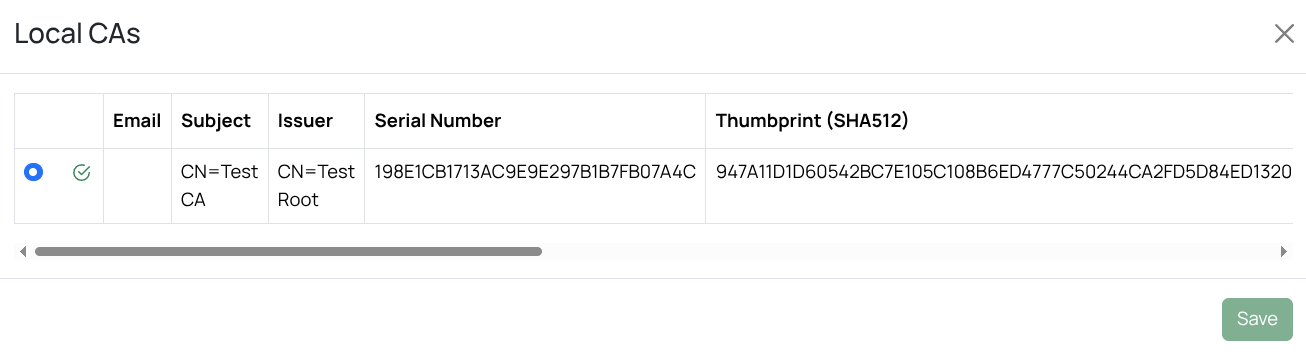
Local CA
The gateway includes an integrated certificate authority (CA) that issues end-user certificates for both internal and external users. This simplifies S/MIME setup and removes the need to rely on a third-party CA.
Note
External email clients will not trust certificates issued by the built-in certificate authority (CA) until you import its root certificate.
The Local CA requires both a root certificate and an intermediate certificate. To create new root and intermediate certificates for the built-in CA, select .
After creating a new local CA, the new CA should be selected .
Note
Local CA offers only basic features. For advanced capabilities such as multiple CA profiles, OCSP, and similar functions, use a dedicated external CA.
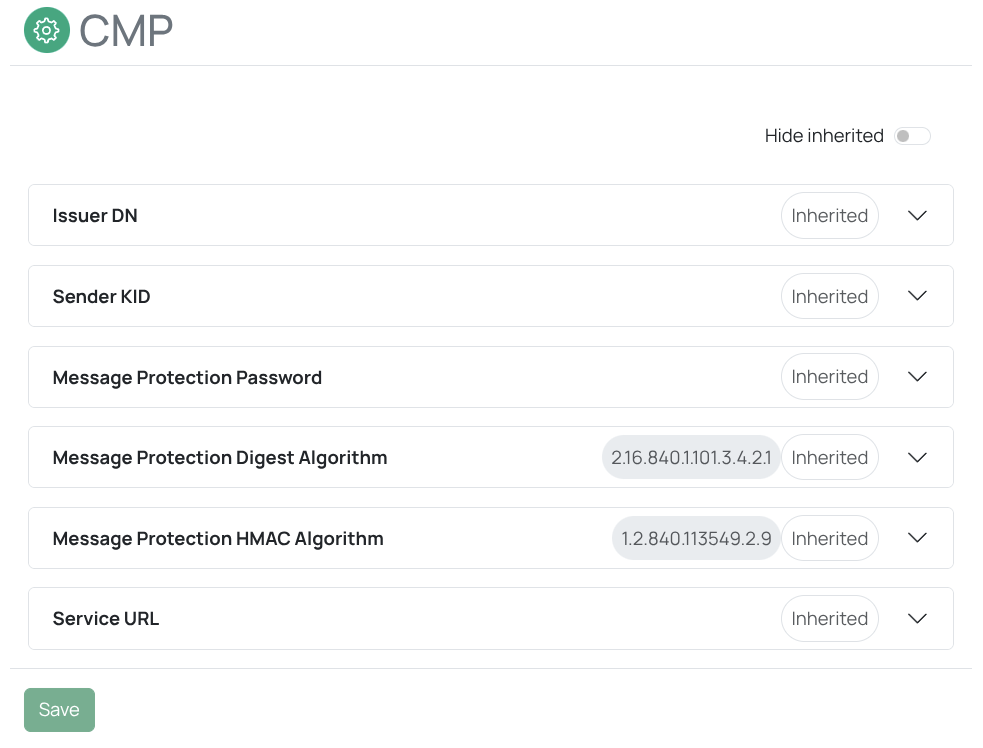
CMP request handler
Certificate Management Protocol (CMP) is an internet standard used to request and manage X.509 digital certificates. A CMP request handler communicates with a remote Certificate Authority (CA) using this protocol to enroll for, renew, or revoke certificates. An example of a CA that supports CMP is EJBCA: https://www.ejbca.org.
You must configure the CMP handler before you can use it ().
CSR request handler
The CSR (PKCS#10) certificate request handler does not issue certificates. Instead, it creates a private key and a certificate signing request (CSR). You can download the CSR and submit it to a remote certificate authority (CA) that supports CSRs for S/MIME certificates. After the CA issues the certificate, import it manually. The gateway will then associate the imported certificate with the corresponding private key. Use the following procedure to generate a CSR and have it signed by a remote CA:
Open the CA page ()
Request a new certificate ()
Select Certificate Authority from main menu to open the “Create new end-user certificate” page.
On the Request Certificate page, at a minimum enter values for “Email address” and “Common Name”, then select CSR (PKCS#10) as the certificate request handler.
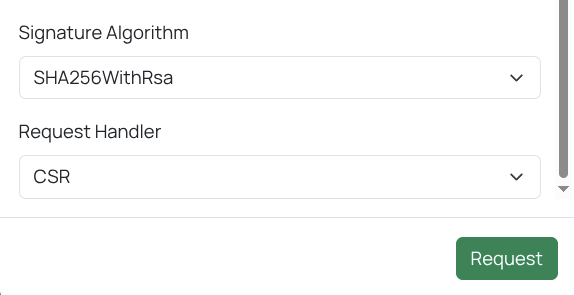
Click Request.
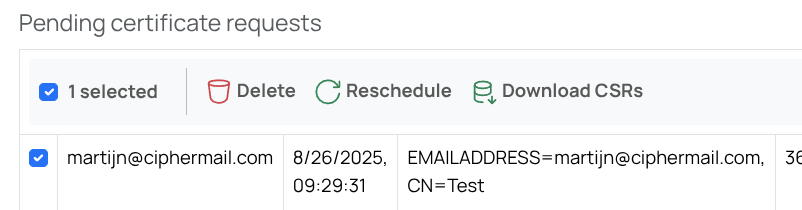
The system creates the CSR and opens the Pending certificate requests page, which lists all pending requests.
Select the newly generated CSR, click Download CSRs, and save the file to your computer.
Send the downloaded CSR to the CA.
Wait for the CA to issue the certificate.
After receiving the certificate from the CA, open the “Pending certificate requests” page and upload the certificate ()
The uploaded certificate will now be associated with the private key and moved to the certificate store.
CEMA request handler
The CEMA Certificate Manager is a modern, fully-featured, certificate lifecyle manager developed by intelliCard Solutions AG (Id-security).
CEMA provides a single, easy-to-use interface for all your PKI tasks by connecting to multiple certification authorities (CAs). It can also connect to the ID-Security (intelliCard) Enrollment Hub, which supports a wide range of enrollment protocols, regardless of the protocols used by your issuing CA.
All certificates are stored securely in a centralized repository, providing easy access for administrators and facilitating efficient management. By implementing granular access controls to manage permissions for certificate management tasks, you ensure that only authorized personnel can perform critical actions on certificates. Define customizable policies for certificate renewal based on expiration dates, usage patterns, and compliance requirements. Automated issuance and renewal ensures uninterrupted service availability suitable for large scale industrial IoT.
The CEMA request handler connects to a CEMA instance running locally or remotely; that instance then connects to the configured remote CA.
If a full certificate lifecyle process is required it is recommended to use the CEMA connector.
For more information on CEMA see https://www.id-security.com/products/cema-certificate-manager-platform
Tip
To request S/MIME certificates on demand, make sure the CEMA request handler is set as the default request handler. You can configure the default request handler either through the user interface () or by using the CLI:
ciphermail-cli property global set --name ca-default-certificate-request-handler --value cema
GlobalSign Atlas request handler
Attention
Ensure that your GlobalSign account is configured to issue Domain Validated (DV) or Organization Validated (OV) certificates. Do not use Sponsor Validation certificates, as they require user-specific information (such as first name, last name, and company) that is not available by default. If you need to issue a Sponsor Validation certificate, use the CEMA connector.
The GlobalSign Atlas certificate request handler allows your organization to obtain certificates issued by GlobalSign. It connects to GlobalSign’s cloud-based certificate management service and requires a valid GlobalSign Atlas account. If you do not have an account, contact GlobalSign to set one up.
Tip
Before you can issue certificates, make sure the GlobalSign certificate root is installed.
Before certificates can be issued by GlobalSign Atlas, the following steps should be taken:
Create API credetials and configure the gateway for Atlas
Request an mTLS certificate
Register your domain(s)
Approve your domain(s)
Optionally, configure the request template
You will need the ciphermail-cli command-line tool for some steps.
Generate API Credential
Log into your GlobalSign Atlas Account
On the GlobalSign Atlas management page, open the API Credentials page ()
Click Generate an API Credential button
Select View and Copy and click continue
Select the active service you want to link to the new API credential and click Continue
Select a familiar name for the new credential and click continue. A new API key and API Secret will be generated.
Warning
The API Secret will only be shown once. You should therefore copy the API Secret before closing the page.
Configure the API key and secret
ciphermail-cli property global set --name gs-atlas-api-key --value <api-key-value>
ciphermail-cli property global set --name gs-atlas-api-secret --value <api-secret-value>
Create mTLS certificate
GlobalSign Atlas uses mutual TLS (mTLS) for authentication. To connect, you must configure a client certificate for mTLS.
The mTLS certificate should be configured with the ciphermail-cli command-line tool:
From the command line, generate an mTLS certificate request and copy the CSR:
ciphermail-cli globalsign atlas create mtls-certificate-requestLog into your GlobalSign Atlas Account. On the GlobalSign management page, open the mTLS certificates page (), then click Generate an MTLS Certificate
On the GlobalSign “How do you plan to connect to the service?” page, select Directly via the API and click Continue
On the GlobalSign “Link API Credential(s)” page, select the API credentials created in the previous steps and click Continue
On the GlobalSign “Paste a CSR” page, copy and paste the CSR which was generated in the first step and click Continue
Copy the generated mTLS certificate by clicking Copy to Clipboard and paste the mTLS certificate to a file.
Copy the certificate file to the CipherMail system and import the mTLS certificate
ciphermail-cli globalsign atlas import mtls-certificate --certificate-file /path/to/certificate
Register your domain(s)
Before requesting S/MIME certificates, your domain must be approved by GlobalSign. To obtain domain approval, complete the following steps:
You must add the domain to Atlas before you can validate it:
Open the domains page from the GlobalSign Dashboard
Click New Domain, select the identity and specify the new domain name to be added and click Save and continue.
Select Verify this domain
Select the preferred validation method. For example for DNS validation, copy the “Domain Verification Code (DVC)” and add a DNS TXT record:
example DNS entry:
ciphermail.com. 300 IN TXT "globalsign-domain-verification=5E6DA5B0F899E345915CA238473338B7"
Tip
If you did not save the DNS token, open the GlobalSign Atlas search domain
claims wizard to view it again. The token will be shown without the
globalsign-domain-verification= prefix.
Configure request template
When you request a certificate, the data sent to GlobalSign is generated from a JSON-formatted request template.
The configured request template can be retrieved with the following cli command:
ciphermail-cli property global get --name gs-atlas-request-template
Tip
The request template value can be extracted from the property value with the help of jq:
ciphermail-cli property global get --name gs-atlas-request-template | jq -r .value | jq
The default request template looks as follows:
{
  "validity": {
    "not_before": "${not_before}",
    "not_after": "${not_after}"
  },
  "subject_dn": {
    "common_name": "${cn}",
    "country": "${c}",
    "state": "${st}",
    "locality": "${l}",
    "street_address": "${street}",
    "organization": "${o}",
    "organizational_unit": [
      "${ou}"
    ],
    "email": "${email}"
  },
  "san": {
    "emails": [
      "${email}"
    ]
  },
  "signature": {
    "hash_algorithm": "SHA-256"
  },
  "public_key": "${public_key}"
}
Fields enclosed in ${} are automatically replaced with their actual values when
you submit a certificate request. If a value is not available, the entire line
is removed from the final JSON request.
Which fields are required for the certificate request, depends on the validation policy set by GlobalSign for the account. The validation policy for the account can be listed using the following cli command:
ciphermail-cli globalsign atlas get validation-policy
If a certificate request fails, check the MPA log. The error message returned by GlobalSign will identify which field is missing from the request. Add the missing field to your request template and try again.
Create a request template JSON file
Configure the new request template
ciphermail-cli property global set file --name gs-atlas-request-template --file <request-template-json-file>
Tip
To request S/MIME certificates on demand, make sure the GlobalSign request handler is set as the default request handler. You can configure the default request handler either through the user interface () or by using the CLI:
ciphermail-cli property global set --name ca-default-certificate-request-handler --value "GlobalSign Atlas"
SwissSign request handler
Attention
Ensure that your SwissSign account is configured to issue Domain Validated (DV) or Organization Validated (OV) certificates. Do not use Sponsor Validation certificates, as they require user-specific information (such as first name, last name, and company) that is not available by default. If you need to issue a Sponsor Validation certificate, use the CEMA connector.
Before you can use the SwissSign request handler, you must have a configured SwissSign account. For information on creating and configuring your account, contact SwissSign.
Tip
Before you can issue certificates, make sure the SwissSign certificate root is installed.
To configure SwissSign follow these steps:
Login to the admin GUI
Open the SwissSign settings page
Enter the username and User secret (API secret) for your SwissSign account
Open the command line and execute the following cli command:
ciphermail-cli swisssign mpki get clientsThis will return a list of the products you can use from SwissSign. Copy the uuid of the product you want to use (the code should starts with the
pma-prefix).Open the SwissSign settings page and paste the uuid value to the “Certificate product reference UUID” field
You should now be able to request a cert using the SwissSign MPKI handler
Tip
To request S/MIME certificates on demand, make sure the GlobalSign request handler is set as the default request handler. You can configure the default request handler either through the user interface () or by using the CLI:
ciphermail-cli property global set --name ca-default-certificate-request-handler --value "SwissSign MPKI"